

Moisture in crawl spaces is a common issue that can lead to a host of problems for homeowners. From mold growth to structural damage, unchecked moisture can wreak havoc on your home's foundation and air quality. Fortunately, a simple yet effective solution is installing a vapor barrier. This article will guide you through the process of vapor barrier crawl space installation, explaining its benefits and how it works in tandem with a crawl space dehumidifier to create a dry, healthy home environment.
What is a Vapor Barrier?
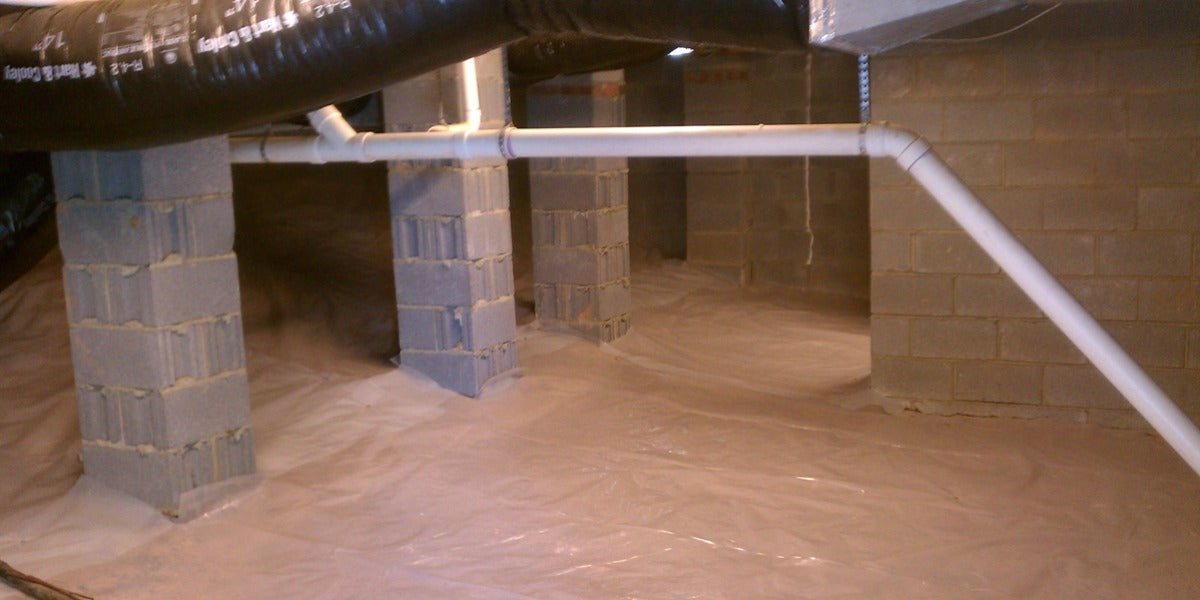
A vapor barrier is a material, typically a plastic or foil sheet, used to prevent water vapor from passing through walls, ceilings, or floors. In crawl spaces, vapor barriers are crucial for controlling moisture levels and preventing the associated problems.
Types of Vapor Barriers
Vapor barriers come in various thicknesses and materials:
1. 6-mil polyethylene: Standard thickness for basic moisture control
2. 10-mil polyethylene: More durable, suitable for frequently accessed crawl spaces
3. 15-20 mil polyethylene: Heavy-duty option for crawl spaces used for storage or housing HVAC equipment
4. Reinforced polyethylene: Offers extra tear resistance
When choosing a vapor barrier, consider the specific needs of your crawl space. For most residential applications, a 10-mil polyethylene barrier provides a good balance of durability and effectiveness.
How Vapor Barriers Work
Vapor barriers function by creating a physical barrier between the damp soil and your crawl space. This prevents moisture from evaporating into the air and rising into your home. When properly installed, a vapor barrier can significantly reduce humidity levels in your crawl space, working in harmony with a dehumidifier to maintain an optimal environment.
The barrier's effectiveness lies in its ability to block water vapor at the molecular level. As water molecules try to move from the damp soil into your crawl space, they encounter the impermeable barrier and are forced to condense back into liquid form, preventing them from entering your home's air.
Benefits of Vapor Barrier in Crawl Space
Installing a vapor barrier in your crawl space offers numerous advantages:
Foundation Protection: By reducing moisture, vapor barriers help prevent wood rot and structural damage to your home's foundation. This protection can save homeowners thousands of dollars in potential repair costs over time.
Energy Efficiency: According to the U.S. Department of Energy, insulating and sealing your crawl space can reduce your energy costs by 15%. When moisture is present, it can compromise insulation effectiveness, leading to higher heating and cooling bills.
Mold Prevention: Limiting moisture inhibits mold growth, improving indoor air quality throughout your home. This is particularly important for individuals with allergies or respiratory issues.
Enhanced Dehumidifier Performance: A vapor barrier complements your crawl space dehumidifier, making it more effective at maintaining consistent humidity levels. This synergy means your dehumidifier won't have to work as hard, potentially extending its lifespan.
Pest Deterrent: A dry crawl space is less attractive to pests like termites, carpenter ants, and other moisture-loving insects. By installing a vapor barrier, you're creating an environment that's less hospitable to these unwanted guests.
Increased Home Value: A properly maintained crawl space with a vapor barrier can serve as a significant selling point for potential buyers. By demonstrating that you have taken proactive measures to control moisture and protect the home’s structure, you can enhance your property’s appeal.
How to Install a Vapor Barrier in Crawl Space
Tools and Materials
Before beginning, gather the following:
1. Vapor barrier material (polyethylene sheets)
2. Measuring tape
3. Scissors or utility knife
4. Double-sided tape or adhesive
5. Crawl space dehumidifier
6. Work gloves and protective eyewear
7. Headlamp or portable work light
8. Knee pads (optional, but recommended for comfort)
Step 1: Prepare the Crawl Space
Start by thoroughly cleaning your crawl space. Remove any debris, sharp objects, or old insulation. Inspect the area for water leaks or other moisture issues and address them before proceeding. This may involve repairing gutters, grading the soil around your foundation, or fixing plumbing leaks.
Ensure proper ventilation during this process by opening any vents or windows in the crawl space. If possible, run a fan to improve air circulation while you work.
Step 2: Measure the Vapor Barrier and Cut
Carefully measure your crawl space, including the floor area, and at least 6 inches up the walls. Cut the vapor barrier material to fit, allowing for overlap at seams. It's better to cut pieces slightly larger than needed, as you can always trim excess later.
When measuring, account for any obstacles, such as support posts or plumbing pipes. You'll need to cut the barrier to fit around these elements, so take precise measurements.
Step 3: Install the Vapor Barrier
Begin at one side of the crawl space, laying down the polyethylene sheets. Seams should be sealed with waterproof tape and overlapped by at least 12 inches. Extend the barrier 6 inches up the walls and secure it with rubberized butyl tape.
For added stability, consider using landscape fabric stakes to anchor the barrier to the ground. This is particularly important in areas where the crawl space may be accessed frequently.
When working around obstacles, cut slits in the barrier to fit around pipes or posts, then seal these cuts with tape to maintain the barrier's integrity.
Step 4: Set Up the Dehumidifier
Once the vapor barrier is in place, install your crawl space dehumidifier. Position it for optimal airflow and connect it to a drainage system or pump to remove collected moisture automatically.
When choosing a location for your dehumidifier, consider factors such as:
1. Proximity to a power source
2. Ease of access for maintenance
3. Ability to distribute dry air throughout the crawl space effectively
Maintenance Tips
To ensure long-term effectiveness:
1. Regularly inspect the vapor barrier for damage or loose seams, ideally every 6-12 months.
2. Clean and maintain your crawl space dehumidifier according to manufacturer instructions, typically involving filter cleaning or replacement.
3. Monitor humidity levels in your crawl space, aiming for 30-50% relative humidity.
4. Check for signs of pest activity or new water intrusion during your regular inspections.
5. To make sure your crawl space stays in top shape, think about having a professional inspection every few years.
Invest in a Dry, Healthy Crawl Space with AlorAir
Vapor barrier installation in your crawl space is a crucial step in protecting your home from moisture-related issues. When combined with a quality crawl space dehumidifier, a vapor barrier creates a dry, healthy environment that safeguards your home's structure and improves overall air quality.
AlorAir crawl space dehumidifiers, like the Sentinel HD55 series, are designed to work in tandem with vapor barriers to maintain optimal humidity levels. We also provide high-quality vapor barrier materials and installation accessories, offering you a one-stop shop for comprehensive crawl space moisture management.
Contact us today with questions about crawl space encapsulation and dehumidification. You're not just protecting your home – you're creating a healthier living environment for you and your family.


